The Anadama bread is a great bread to start the challenge-it's straightforward and easy to follow recipe. It's a two-day process that starts off with a soaker made of cornmeal and water. On the second day, the soaker is added to a flour, water and yeast mixture (also called a sponge) and allowed to rest for an hour. I prefer to use active dry yeast over instant. I don't mind taking the extra step of dissolving the yeast before adding to the dough. Somehow, using "instant" seems like it's just not as potent as the active dry or cake yeast. It probably is with the correct conversion. But I learned in class using cake yeast. So we all have our baking quirks, don't we.
Then the remainder of the ingredients are added. I chose to use butter and blackstrap molasses. Butter over shortening any day. Reinhart suggests using the lightest molasses for smoother flavor, though I used the darker blackstrap available at Whole Foods. While I learned to make bread using my hands to mix and knead, I decided to use my Kitchen Aid Classic mixer for this tacky recipe. I mixed the ingredients first by hand making sure it's incorporated well and then transferred the sticky dough to the mixer for kneading. The dough was kneaded for about 8-9 minutes by mixer. I needed to add just a bit more flour to the dough till it became less sticky and more tacky which passed the window pain test. Right when I think the dough is becoming developed, I usually return it back on the workbench and knead till done. I'm still learning the feel of the dough. In this recipe, I didn't want to change the right consistency by adding too much flour just to prevent it from sticking in the bench or my fingers, so I left the dough in the mixer till I felt it was fully developed.
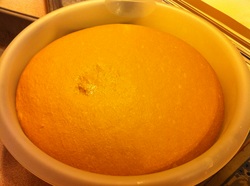
I didn't check the dough temperature but I did let the bowl sit next to fireplace since the kitchen thermometer was reading 64 degrees in the room. After it doubled in size, roughly an hour and a half, I split the dough into two and placed them into two loaf pans. They proofed at room temperature for close to 90 minutes but did experience the loaves crest above the tops of the pans. I suspect it was too cold in the room.
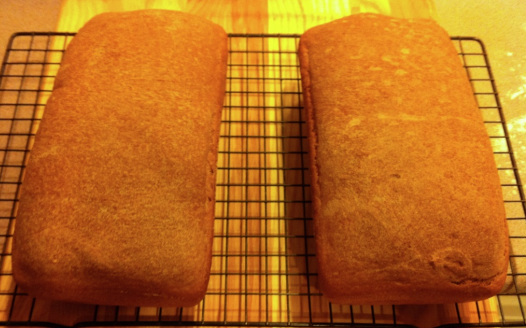
The bread baked for a total of 45 minutes, rotating the sheet pan after 20 minutes for even baking. I removed the loaves from the oven once it registered 190F in the center.
Then the remainder of the ingredients are added. I chose to use butter and blackstrap molasses. Butter over shortening any day. Reinhart suggests using the lightest molasses for smoother flavor, though I used the darker blackstrap available at Whole Foods. While I learned to make bread using my hands to mix and knead, I decided to use my Kitchen Aid Classic mixer for this tacky recipe. I mixed the ingredients first by hand making sure it's incorporated well and then transferred the sticky dough to the mixer for kneading. The dough was kneaded for about 8-9 minutes by mixer. I needed to add just a bit more flour to the dough till it became less sticky and more tacky which passed the window pain test. Right when I think the dough is becoming developed, I usually return it back on the workbench and knead till done. I'm still learning the feel of the dough. In this recipe, I didn't want to change the right consistency by adding too much flour just to prevent it from sticking in the bench or my fingers, so I left the dough in the mixer till I felt it was fully developed.
I didn't check the dough temperature but I did let the bowl sit next to fireplace since the kitchen thermometer was reading 64 degrees in the room. After it doubled in size, roughly an hour and a half, I split the dough into two and placed them into two loaf pans. They proofed at room temperature for close to 90 minutes but did experience the loaves crest above the tops of the pans. I suspect it was too cold in the room.
The bread baked for a total of 45 minutes, rotating the sheet pan after 20 minutes for even baking. I removed the loaves from the oven once it registered 190F in the center.
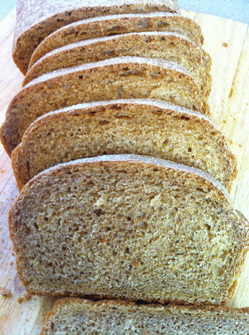
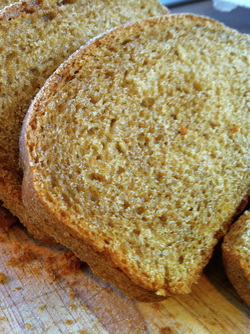
Results: The recipe was rather staightforward. I was surprised how well the dough came together. I've never used molasses before. The challenge for me is the actual shaping the dough. I need to remember to be more deliberate in my hand movements and how I form the dough is pretty much the way it 's going to turn out once it's baked. I think it's a great recipe to follow for novice bakers like myself. It is a rich bread and soft in texture, made to be eaten with real butter at breakfast. The molasses flavor is discernable. It's sweeter than what I normally like. Definitely a bread for breakfast or snack. It was a nice breakfast treat-lightly toasted with Irish butter.

 RSS Feed